環境構築不要!最小構成で理解する Riot 超入門編
コンポーネント指向フレームワークである Riot を最近良く耳にします。
Riot は、比較的容易なフレームワークです。
でも、ちょっと試したいだけで環境構築するのは手間ですよね。
この記事では、簡単に試せるように、
テキストエディタとブラウザさえあれば動作する構成にしました。
Riot をスムーズに理解するために、最小構成のサンプルの HTML を作成し、
そこに徐々に肉付けして、 Riot の様々な機能について説明します。
それでは、 Riot を見ていきましょう!
今回説明する内容
今回は超入門編なので、 Riot の本当に基本的な機能を中心に説明します。
説明する内容は以下です。
・ カスタムタグの定義
・ カスタムタグ内の文字を設定
・ カスタムタグのスタイリング
・ カスタムタグのJavaScript
まずはベースとなる Riot のコードは以下です。
ちなみに、これを実行しても何も表示されません。
<html lang="ja">
 <head>
    <meta charset="UTF-8">
    <title>Riot sample</title>
 </head>
 <body>
    <script src="https://cdn.jsdelivr.net/npm/riot@3.6/riot+compiler.min.js"></script>
    <script>riot.mount('*');</script>
 </body>
</html>
やっていることは2つです。
<script src="https://cdn.jsdelivr.net/npm/riot@3.6/riot+compiler.min.js"></script>
まずは、 CDN で Riot の本体と、コンパイラーを取得。
<script>riot.mount('*');</script>
次に Riot タグをマウントする処理を書いています。
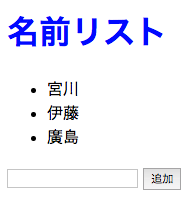
こちらに肉付けをしていき、最終的に以下の様な「名前リスト」を作成していきます。

カスタムタグの定義
カスタムタグを追加します。
これを実行すると、名前リスト・入力フォーム・追加ボタンが表示されます。
まだ、この時点では動作はしません。
<html lang="ja">
 <head>
    <meta charset="UTF-8">
    <title>Riot sample</title>
 </head>
 <body>
    <name-list-tag></name-list-tag>

    <script type="riot/tag">
    <name-list-tag>
      <h1>名前リスト</h1>
      <ul>
        <li>宮川</li>
        <li>伊藤</li>
        <li>廣島</li>
      </ul>

      <form>
        <input>
        <button>追加</button>
      </form>
    </name-list-tag>
    </script>

    <script src="https://cdn.jsdelivr.net/npm/riot@3.6/riot+compiler.min.js"></script>
    <script>riot.mount('*');</script>
 </body>
</html>
追加箇所について説明していきます。
    <script type="riot/tag">
    <name-list-tag>
      <h1>名前リスト</h1>
      <ul>
        <li>宮川</li>
        <li>伊藤</li>
        <li>廣島</li>
      </ul>

      <form>
        <input>
        <button>追加</button>
      </form>
    </name-list-tag>
    </script>
この部分では、 name-list-tag というタグを定義しています。
カスタムタグは type=”riot/tag” という scriptタグ で挟みます。
また name-list-tag タグで挟むことで、カスタムタグ名を定義します。
中身は通常の HTML と変わりません。
<name-list-tag></name-list-tag>
この部分で、定義した name-list-tag タグを使用できます。
感覚的には、通常のタグを使うのと変わりません。
カスタムタグ内の文字を設定
このサンプルでは、文字を後から設定しています。
<html lang="ja">
 <head>
    <meta charset="UTF-8">
    <title>Riot sample</title>
 </head>
 <body>
    <name-list-tag></name-list-tag>

    <script type="riot/tag">
    <name-list-tag>
      <h1>{ opts.title }</h1>
      <ul>
        <li each={ opts.items }>{ friend_name }</li>
      </ul>

      <form>
        <input>
        <button>追加</button>
      </form>
    </name-list-tag>
    </script>

    <script src="https://cdn.jsdelivr.net/npm/riot@3.6/riot+compiler.min.js"></script>
    <script>
      riot.mount('name-list-tag', {
        title: '名前リスト',
        items: [
          { friend_name: '宮川' },
          { friend_name: '伊藤' },
          { friend_name: '廣島' }
        ]
      })
    </script>
 </body>
</html>
riot.mount では、タグをマウントすることができますが、
オプションで、値を設定することができます。
ここでは、 title と items配列 を定義しています。
カスタムタグ内の {} で囲んでいる箇所で、 opts を使うことで、値を使うことができます。
カスタムタグのスタイリング
次はスタイルを付けていきます。
タイトルの文字が青色になります。
<html lang="ja">
 <head>
    <meta charset="UTF-8">
    <title>Riot sample</title>
 </head>
 <body>
    <name-list-tag></name-list-tag>

    <script type="riot/tag">
    <name-list-tag>
      <h1>{ opts.title }</h1>
      <ul>
        <li each={ opts.items }>{ friend_name }</li>
      </ul>

      <form>
        <input>
        <button>追加</button>
      </form>

      <style>
        name-list-tag h1 {
          color: blue;
        }
      </style>
    </name-list-tag>
    </script>

    <script src="https://cdn.jsdelivr.net/npm/riot@3.6/riot+compiler.min.js"></script>
    <script>
      riot.mount('name-list-tag', {
        title: '名前リスト',
        items: [
          { friend_name: '宮川' },
          { friend_name: '伊藤' },
          { friend_name: '廣島' }
        ]
      })
    </script>
 </body>
</html>
カスタムタグ内の style タグで挟んでいる箇所で、 name-list-tag のカスタムタグの h1 タグに対して、文字色を青色に設定しています。
記法は通常の css と変わりません。
カスタムタグのJavaScript
カスタムタグに対して、 JavaScript を定義していきます。
ループ と ref も使用しています。
このサンプルでは、フォームに入力して追加ボタンを押すと、新たな名前がリストに追加されます。
<html lang="ja">
 <head>
    <meta charset="UTF-8">
    <title>Riot sample</title>
 </head>
 <body>
    <name-list-tag></name-list-tag>

    <script type="riot/tag">
    <name-list-tag>
      <h1>{ opts.title }</h1>
      <ul>
        <li each={ items }>{ friend_name }</li>
      </ul>

      <form onsubmit={ add_name }>
        <input ref="friend_name">
        <button ref="submit">追加</button>
      </form>

      this.items = opts.items
      add_name(e) {
        this.items.push({ friend_name: this.refs.friend_name.value })
        e.preventDefault()
      }

      <style>
      name-list-tag h1 {
        color: blue;
      }
      </style>
    </name-list-tag>
    </script>

    <script src="https://cdn.jsdelivr.net/npm/riot@3.6/riot+compiler.min.js"></script>
    <script>
      riot.mount('name-list-tag', {
        title: '名前リスト',
        items: [
          { friend_name: '宮川' },
          { friend_name: '伊藤' },
          { friend_name: '廣島' }
        ]
      })
    </script>
 </body>
</html>
部分毎に解説します。
      this.items = opts.items
      add_name(e) {
        this.items.push({ friend_name: this.refs.friend_name.value })
        e.preventDefault()
      }
この部分が JavaScript の処理です。
add_name 関数を定義し、名前を追加するようにしています。
refs を使用していますが、これはカスタムタグ内で定義した ref にアクセスできます。
items の配列に、フォームで入力した名前を追加します。
      <ul>
        <li each={ items }>{ friend_name }</li>
      </ul>
この部分では、 each を使用していますが、これにより items の配列を展開して、
その中の friend_name を順次取り出して表示します。
まとめ
簡単な Riot を使った名前リストアプリを作成しました。
フレームワークの特徴を抑えれば、書き方は HTML / CSS / JavaScript のままなので、学習コストを抑えることができます。
これから、コンポーネント指向になってくる傾向もあるので、抑えておいてもいいかもしれませんね!
-
お問い合わせ
SiTest の導入検討や
他社ツールとの違い・比較について
弊社のプロフェッショナルが
喜んでサポートいたします。 -
コンサルティング
ヒートマップの活用、ABテストの実施や
フォームの改善でお困りの方は、
弊社のプロフェッショナルが
コンサルティングいたします。
今すぐお気軽にご相談ください。
今すぐお気軽に
ご相談ください。
(平日 10:00~19:00)
今すぐお気軽に
ご相談ください。
0120-90-5794
(平日 10:00~19:00)
グラッドキューブは
「ISMS認証」を取得しています。

認証範囲:
インターネットマーケティング支援事業、インターネットASPサービスの提供、コンテンツメディア事業
「ISMS認証」とは、財団法人・日本情報処理開発協会が定めた企業の情報情報セキュリティマネジメントシステムの評価制度です。


